Finally, An Update

Hi everyone,

Sorry for the delay in updating this blog.  Things got really hectic around the holidays (back in 2012) and then after that, I guess I got lazy (really lazy).  My apologizes.

First thing first, updates with the store:

1.  We have expanded last year and finally got around to do some renovations this year…June and July were brutal with the installation with new coolers and freezer + relocating items.  Zenol pas (the Korean pain relieving sticky pads) is officially my newest best friend.

2.  We are not done with renovations, so please pardon our dust and our rearrangement if you can’t find certain items in their usual spot.  I will try my best to direct you since I’m always there from early afternoons till close.  Yup, every single day unless I have plans.

3.  The other local Korean grocery store in Schaumburg has changed into a national chain BUT we are still a mom-and-pop store.  And my dad is still kicking it after 1 year!!  Come in and check out the sales that we are having.  Our sales usually go until my dad feels like it not like the other stores where it’s just a week or so; I assure you, he is so old-schooled that Osaki Brand Imitation Crab meat is still on sale for $5.99 and 3 Crabs Brand Fish Sauce for $2.99 … people, it’s been 1 year already!

Secondly, updates about this blog:

1.  I will try to post more food projects.  I think the world needs to know the wonders of Korean food.  The problem is I don’t cook but in theory know the basics of everything (because customers ask about cooking all the time).  Thus, I will post only about the stuff I did.  If you all have any questions about cooking, hit me a message and you can test my knowledge, or I will answer you with what my mom said.

2.  I will also try to post about what goes on inside our store.   Previously, I don’t think I actually posted about sales or uploaded any photos of the store, so that is all on the way.

Lastly, if you (the readers) have any questions about Korean food or products, feel free to ask.  I might also post things that even I had questions about (i.e., difference between the million types of soy sauce).

So please look for to my posts.

Soo

Project Asian Pear Butter

After a scorching hot and humid summer, it has finally gotten cool.  I wasn’t paying attention till a few days ago when my mom picked all our pears from our Japanese pear tree in our backyard and brought them to the store.  Yes, we have a pear tree and also an apple tree (I think that one’s fuji apple tree) in our backyard.  Our parents had bought them and planted them when we moved into our current house over 20 years ago.

We never really had a chance to enjoy any of the Japanese pears because either bugs would dig through all over it or animals would leave some on the ground with their bit marks.  But this year was different, it’s called pesticides.  I loved the fact that our tree was organic (seriously nothing but nature for that tree) but I decided early this spring that I wanted to enjoy our pears for once.  So I took a trip to Menards and asked a girl who worked there for pesticides and bought something that I just combined with water and poured around the base of the tree.  I did it twice and saw a major difference this year.  Oh course bugs and animals still enjoyed them but finally, we can enjoy some pears (even the ones with some minor bug bites/holes).

After being lugged around from the backyard, then to the garage, then to the store, back to the house and then being washed, the pears got some bruises.  Pardon the bunny ears shadow, it’s my iphone cover.

Getting to the point, I was thinking of making pear preserves (because I love preserves more than jelly) and looked up some recipes online.  Okay, getting pectin (which I have no idea what it is) and lots of other ingredients, seemed like too much of a hassle until I landed on one blog post that talked about pear butter.  Then the light bulb in my head light up and thus, the quest for a good recipe.   I modified some stuff from this site (http://www.simplyrecipes.com/recipes/pear_butter/) to my own preference since I am using Asian pears, plus, I didn’t have a food scale so I winged it.   (NOTE:  I was originally going to do this at the store, but due to not wanting to occupy our kitchen stoves,  this became an overnight project at home).

Ingredients

1.  Asian pears (about 8 cups, I peeled and corked everything)

2.  Fresh Lemons (about 2, 3/4 of a cup)

3.  Star Anise (about 1 or 2 small whole ones – okay, this one I didn’t know what the heck it was and googled it.  It’s seriously a spice shaped like a star and smells like licorice that I found at World Market for $1.99 a pack).

4.  Fresh (Sliced) Ginger (a little would do, my ginger root was .09 lbs that was about an 2 inches by .75 inches which I peeled and sliced them into thin pieces)

5.  Ground Cardamom (try 1/4 teaspoon and add more to your preference – didn’t know what this was either and googled it, looks like McCormick’s gourmet collection has one but I  also found it at World Market for $3.99 a bottle).

6.  Ground Nutmeg (try 1/4 teaspoon and add more to your preference)

7.  Sugar (2 and 1/4 cup)

Procedures

1.  I prepped the pears and ginger and added them to the pot with 2 cups water and 3/4 cup of lemon juice that I freshly squeezed from my lemons.

2.  The heat was on high until my batch boiled for a few minutes and then reduced the heat to a medium.  I let mine boil without a lid for a while because it had a ton of water in it for about 10-15 minutes and then covered it for continued on medium heat for about 15-20 more minutes.  I am going to recommend that you should boil your batch a bit longer until everything is so soft that it’s mashable.

Pear, Star Anise, and Ginger boiling in Water and Lemon Juice.

3.  I strained out the pear, ginger, and star anise and kept all the liquids.  Do not pour anything out.

4.  Toss out the ginger and star anise.

5.  Mash / puree / blend your cooked pears.  This is a bit tricky, the online recipes told me that I needed a food mill and chinois.  Of course I didn’t know what these were so I googled them and found that they are used to basically have your food to be more of a mush form to give it like an apple sauce texture instead of blending everything to more a smoothie juice feeling.  These cooking equipments could cost anywhere from $30 to over $50 from what I saw on Amazon and Google Shopping so as a great alternative, I used a metal strainer from my parent’s store (cost is anywhere from $3.99 to $6.99 for a small to medium stainless steel strainer).  So from the last part of step 2 (where you should cook everything till super tender), I used the back of a spoon and pushed all the cooked pears and mashed it through my metal strainer (so I adding pressure as I pressed the back of my spoon down from left to right for the pears to go through).

To give you an idea of the stainless steel strainer and the mashing process.

6.   Whatever I couldn’t mash, I used a small blender to blended them with some of the liquid / juice.  If everything was cooked until super tender, this step wouldn’t be used and step 5 would be a breeze.

7.  I added the mashed pear / pear puree, the liquids, nutmeg, cardamom, and sugar into a slow cooker and placed the heat on high.  Make sure you stir the batch before you close the lid.

8.  After it comes to a boil (for me, I left it alone for an hour), I turned the slower cooker temp to low and will leave it like that over night.

Conclusions

You are probably wondering for how long you cook it for, well I don’t know yet because I have just turned my heat to low for the night.  But I will tell you that I made a batch with the recipe above and another batch with half the quantity (4 cups of pears) without lemon juice.  The smaller batch, I decided to make this batch because I was curious about the lemon factor.  I wanted to make Pear Butter NOT Pear and Lemon Butter.  For the smaller batch, I did add some more water (maybe 1 cup) because it didn’t have as much liquids as the original batch.  In addition, I did notice a huge test difference.  The original batch definitely had the tangy lemon taste to it that made it refreshing and light where the smaller  batch was just sweet.  To give the smaller batch more favor, I did end up putting the same amount of nutmeg and cardamom.   This was all during a taste test after I have completed Step 7 before.  After Step 8, I had another taste test and definitely the smaller batch, without the lemon, gives the batch a fall/winter feel and the original batch would be great for the spring/summer season for its’ refreshingness from the lemon juice.

You don’t necessarily have to use a slow cooker, the recipe online called for boiling for 45 minutes to 2 hours until your pear butter batch is not runny if you place some on a plate; but due to time constraints (meaning sleep) and wanting this project to be low maintenance (meaning that I didn’t wanted to slave the night away stirring by the stove), I decided on the slow cooker.

This is where I am at tonight.  For the rest, I will add an update below.


**  UPDATE  **

So overnight, it cooked well but it wasn’t to my liking with the texture consistency.  I cooked it for about a 1/2 day more and realized that I burnt it and started all over again.  To be honest, the cooking time is up to you.  As long as it’s not runny after you pour a spoonful on a plate, then you should be fine.


Project Maesil (“매실 엑기스” – Plum Extract) Part 2

It has officially been 90 days (yesterday) since I have started this project.  Since my last post till yesterday, I have taken my jars of maesil out and have stirred them occasionally (more like when I remembered to) so that all the sugars would melt .  I have also left them out over night to help with the sugar melting process.  And yes, I have taken some taste tests along the way and boy did it smell and taste good.  My batch is sweet and tangy.

So what we (my mom and I) did during the day was first, we tried to mix all the batches in so that we could have one uniform taste.  One jar was slightly sweeter and / or tangier than the other so we mixed it.  Second, we tried to strain out all the little particles that have formed or was part of the maesil and also the maesil itself.  With your shriveled up maesil, you can do whatever your feel like with them (see next steps for your options).   Lastly, jar the extract.

From what was left after numerous taste tasting was 4.5 jars left.  From there, the liquid alone (which is your maesil extract) ended up being 3.75 jars (what I mean by jars are those 1 gallon-ish kimchi glass jars).

Next Steps:

1.  Refrigerate your extract and use whenever you need it  (in my previous post, I mentioned waiting 6 months, but my mom said that it doesn’t matter, but for sake of the project, I plan on hiding one jar for 6 months)…

  • Option 1:  mix some extract with cold water and have an iced drink (your preference on the ratio),
  • Option 2:  mix some extract with hot water and have a hot drink (your preference on the ratio),
  • Option 3:  just eat a spoonful to help with your stomachache.

2.  What to do with your maesil that you strained out from your extract…

  • Option 1:  store it in the frig. and consume when you have an upset stomach,
  • Option 2:  store it in the frig. and boil them to make hot maesil tea (another way of using maesil as a drink),
  • Option 3:  make plum wine (I wasn’t thinking and used it all for plum wine, I ended up with 3 batches of what will be plum wine made with the maesil and soju, and maesil and vodka, again, the ratio of liquor to maesil was my preference so no rules here, I filled the maesil about 1/3-1/2 way in a jar and added soju / vodka until the jar was 2/3-3/4 full).
  • Option 4:  use it for cooking (make a side dish, add it to a dish to bring out the flavor, etc)

3.  Either way, I am going to save up all the seeds and make a small pillow out of it.  I heard that it’s good for people who get hot easily when sleeping.

More Stuff Learned (from Customers, Experimenters, and the Project Itself):  

1.  The maeil without any imperfections on them will have shriveled up.  The maeils that had tears on them, some of them bloated up to the 1.5 sizes of the original size.  It’s kinda cute.

2.  The thing about brown sugar from my previous post, one of the employees used brown sugar and constantly mentioned that her batch smelled and tasted like alcohol.  But after awhile, or to get rid of that, give it some love.  Every week or when you remember, stir you batch to air it and this will help to get rid of the alcohol scent.

3.  For future reference, I don’t mind implementing the 1 scoop to 1 scoop rule (sugar to maesil ratio).  The batch can be tangy.  When my mom and I spilt the original batch into 5 different jars, one had more sugar in it and that one was really good.

4.  The issue about the mold, who cares said the customer who sparked my whole curiosity  on this project.  Apparently the mold will eventually trickle down when you continuously stir the batch throughout your 90 days period.  The mold DOES NOT AFFECT the taste.   One of the 5 different jars, is the one that my mom and I washed and removed the molds from the maesil and filled up the 5th jar with that.  Of course we couldn’t get all the mold, and yes, mold did form again since we didn’t refrigerate that one right away; BUT, this one tasted just as good as the other ones and I didn’t catch the “this has gone bad” feeling / taste at all.

During one of them times I took out the batch to stir. Notice the sugar at the bottom, it hasn’t melted yet.


**Sorry, I wasn’t thinking and forgot to take pictures today.  I promise to take pictures tomorrow of the end product will upload when I get a chance.**


Project Maesil (“매실 엑기스” – Plum Extract) Part 1

Sometime in May, yeah I should have started blogging earlier, a customer comes in excited about buying 매실 (maesil) from Assi Plaza in Niles.  Maesil to me means Japanese Plum, but I was proven wrong today through Wikipedia.  This fruit is called a Chinese Plum or a Japanese Apricot….I think I will just stick with calling a Japanese Plum cause the liquors are sold as Plum Wine.  Anyways, in Korean, it is called “maesil,” in Japanese, “ume” and in Chinese, “meizi.”  The fruit itself is small, maybe 1 inch tall and about 2/3’s inch wide.  The color should be like a light green to green.

Going back to the story, she was excited about buying the fruit to make an extract.  I got really interested in the whole making process and got a few of the employees interested in too.  A few days later, I landed myself a 25 pound box of maesil that costed me about $8 a pound (yikes, I know, this is pricey but I got wholesale price compare to the retail price of $10~$20 bucks for the early bird buyers at Assi Plaza and H-Mart), and 3 employees split a 25 pound box.  Time for PROJECT MAESIL.

What You Need:

1.  Maesil

2.  White Sugar (Do not use Brown Sugar…something about them having their own natural scent that doesn’t work well with the maesil, I forget the rest)

3.  Container with a lid that is big enough to hold your batch

What to Do:

1.  Wash the fruit and let it dry completely (my mom suggested overnight).

2.  Remove the ends (leaves and fuzz) with a toothpick (I didn’t do this cause I was told later about this but just for you, the reader, I found out that if you use a toothpick, the ends that have tiny leaf particles and fuzz that can be easily removed).

3.  OPTIONAL:  Remove all the imperfect ones, one employee said something about having a tear on the skin of the fruit that isn’t good but I forget why (to tell you something funny, when I washing my batch I found one maesil that had a teeth mark on it…guessing someone was really interested in the taste after they found out it was selling for $8 a pound…I just ended up cutting that part off and using everything whether prefect or not).

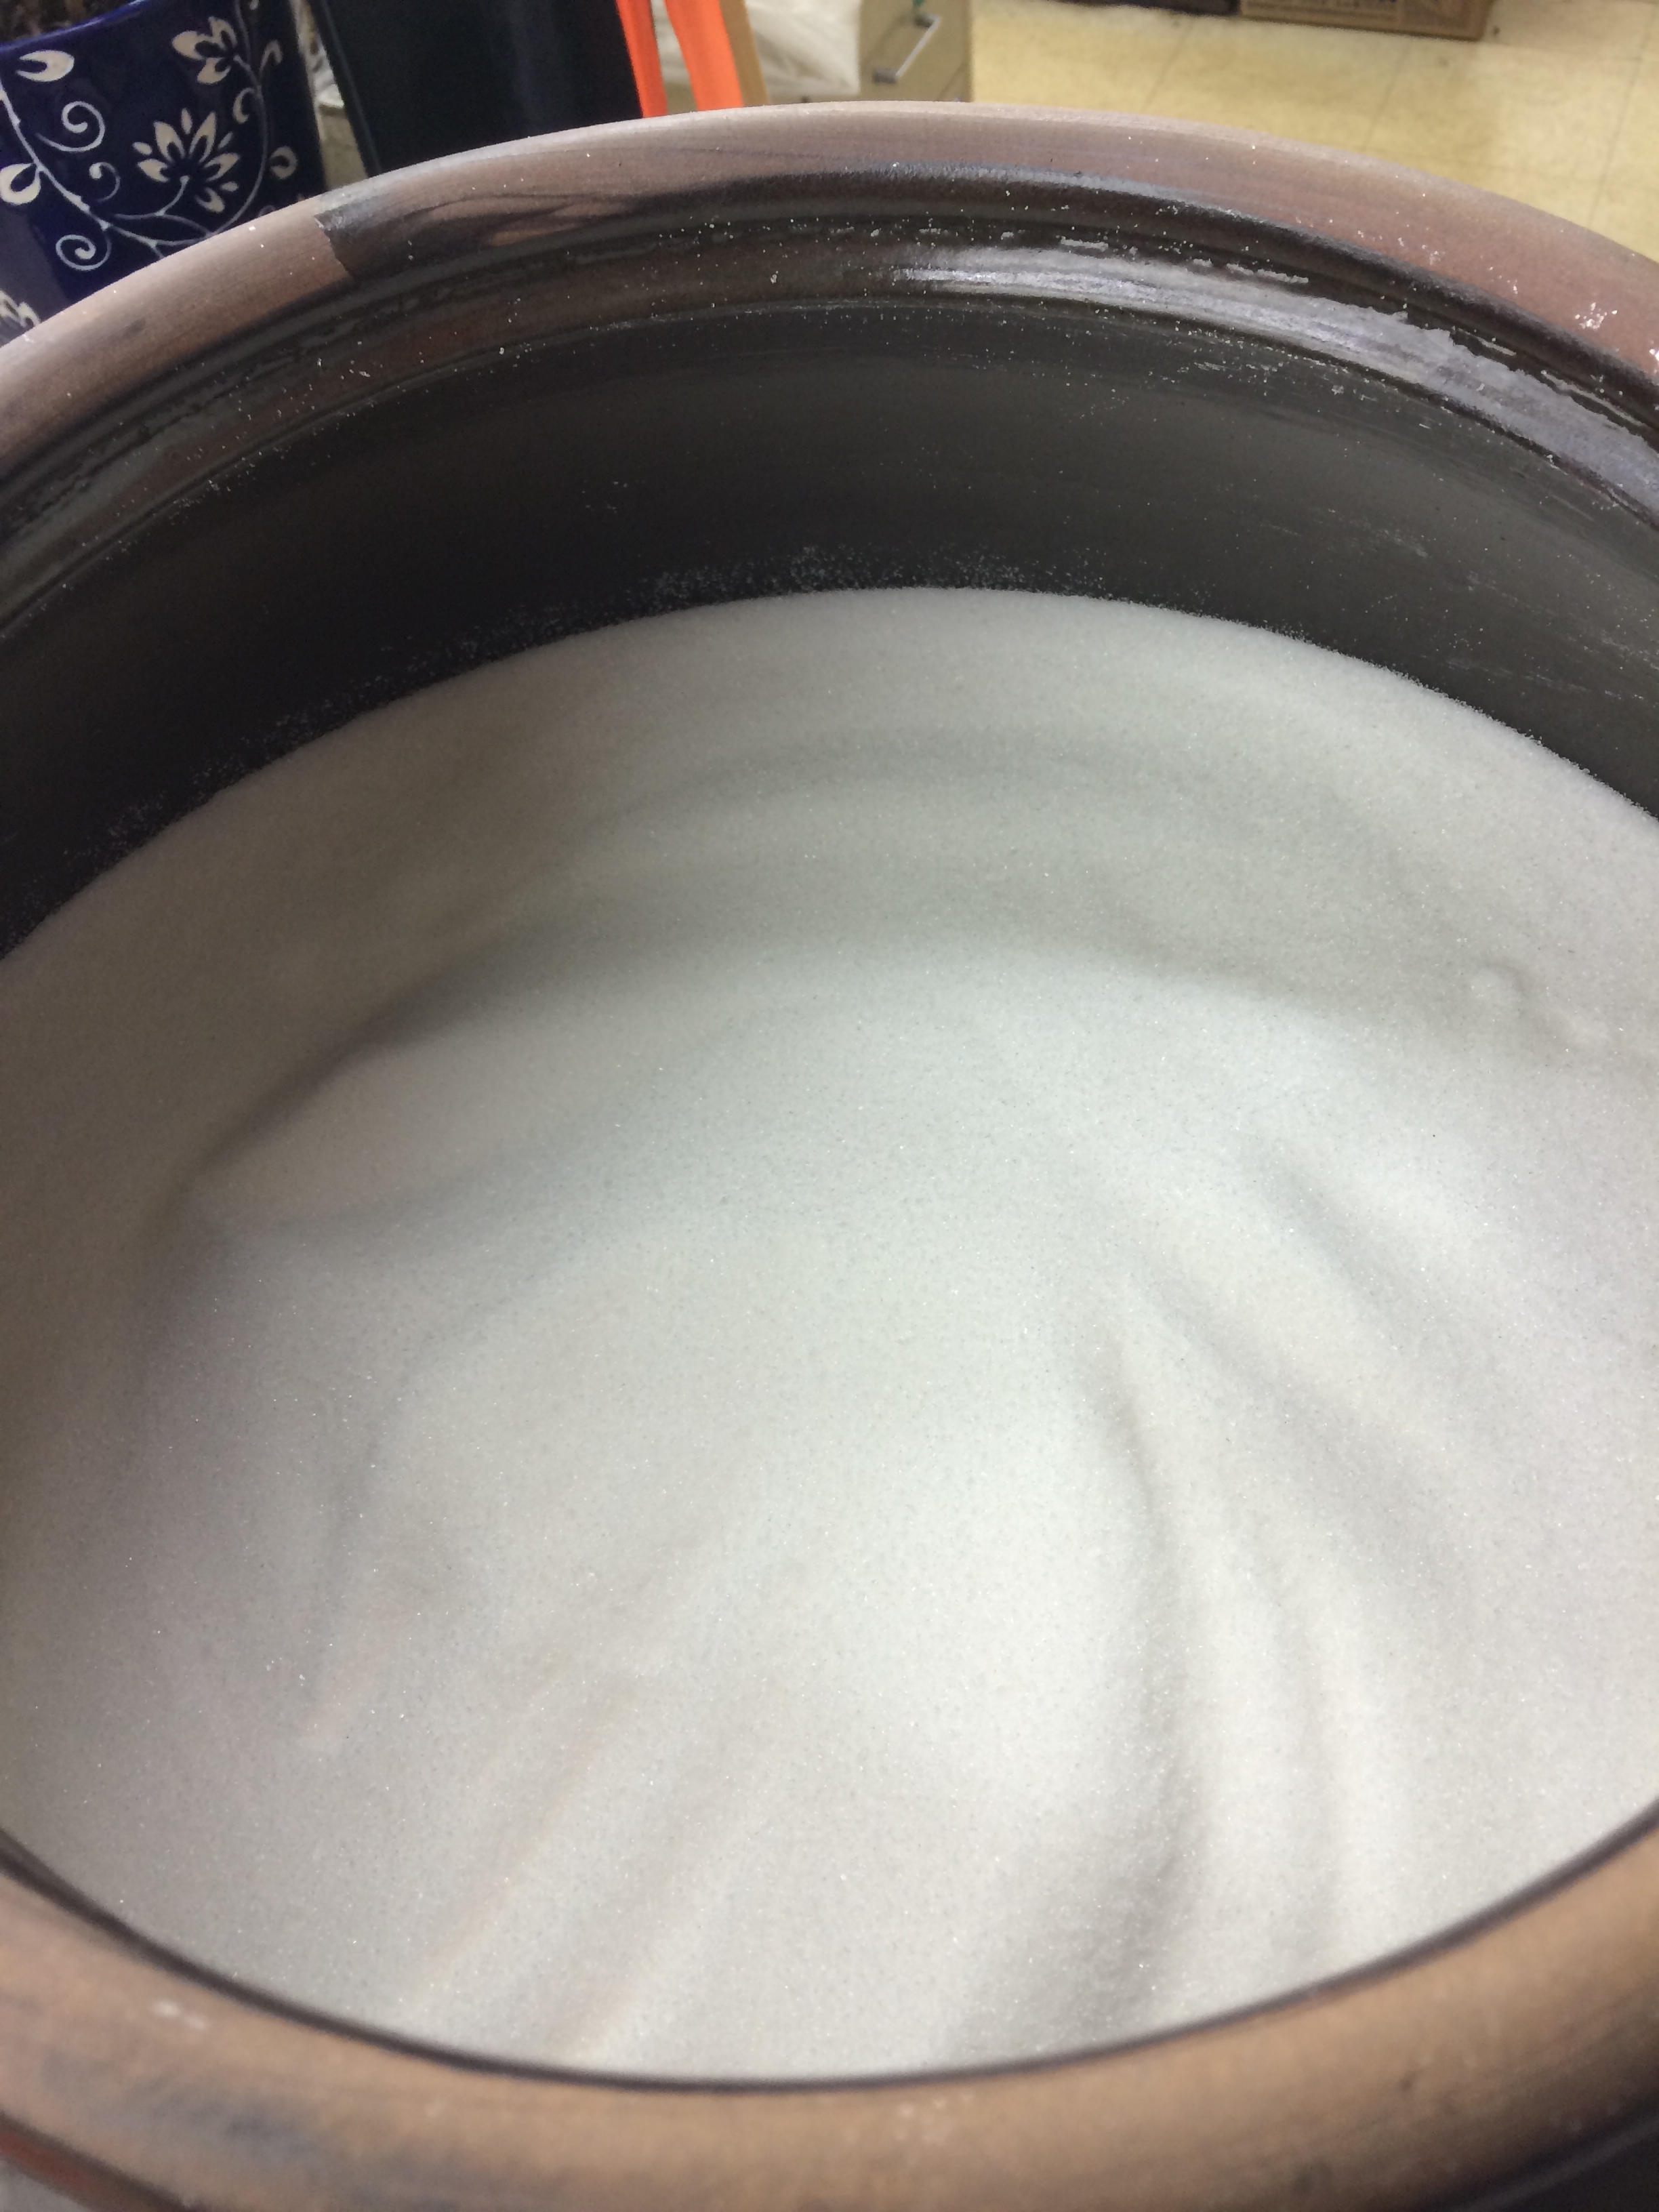
4.  Here comes the tricky part, cause I heard a lot of different things, in your container (I used a 황아이, the traditional clay jar) add 1 scoop of maesil to 1 scoop of sugar.  The ratio should be 1 to 1 (some have interpreted this as 1 to 1 pounds but I was told scoops…yes, the sugar would be too much due to the mass difference but I don’t think it is wrong cause I, too, thought it was too much when filling up my clay jar and somewhere in the middle, turned to 2 scoops of maesil for 1 scoop of sugar and then switched backed to the 1 to 1 at the end and added a few more scoops to completely cover my batch with sugar…my pounds ratio ended up being 25 pounds of maesil to 28 pounds of sugar).

5.  Close your container with the lid and let it sit for about 90 days (yup, you heard me, 90 days…also, place in room temperature).

6.  Remove the maesil and store it for another 6 months (yes I know, it’s a long process when you can go buy it at a Korean store in those 12 oz cans).

Other Notes / Comments:

In your container, the sugar will melt to liquid form with that and juices from the maesil (this smells really good too).  This will eventually turn into an extract and the maesil will shrivel up.

Since I used a 황아이 (clay jar, forgive me if I spelled this wrong in Korean), after one week I noticed that the sugar have melted and mold had already started to form.  Then two days later, the mold grew way too much so that I got yelled at by my mom (who was out of town and returned by then).  We removed the moldy ones and separated our batch into 5 different glass jars, so eventually they will all taste differently.

The mold formed because the maesil(s) would rise to the surface after the sugar had melted down.  With air and/or moisture in the jar, mold can happen because this is sitting in room temperature.  Tips I heard was to put water in zip lock bags (water packets, double the zip lock if you feel like they will leak cause you don’t want any water going into your batch) and place them on top of your batch after you first see the signs of sugar melting and plums rising.  This water packets will float, pushing the maesil down, and preventing it from rising to the surface (one employee tried the water packets but still found her maesils to come to the surface on the edges and formed molds, so you have to completely cover the whole surface of your batch with water packets).

What my mom and I did with our separated batch was that we refrigerated them to prevent any more maesils to grow mold.  I think this was about 1 1/2 weeks to 2 weeks after I first placed the sugar and maesil together.  But essentially, when you see the first signs of molding, don’t refrigerate them right away cause your sugar probably hasn’t melted half way yet.  Our batch was 3/4 melted when we refrigerated it and till now (over 30 days in), the rest of the sugar hasn’t melted.

To help with the melting process, one of the advices I received was to give it some love every week, meaning stir it so your sugar would melt evenly.  I actually haven’t done much of it.  After 1 month of refrigeration, I finally checked on it yesterday.  I also took a taste test while stirring each jar, and yup, I was right, each batch tasted slightly different.  Oh well, trial and error.

Since the sugar didn’t melt all the way, my mom and I were talking about leaving the batch back at room temperature for a day or so for the rest of the sugar to melt.  We haven’t decided yet put will let you know in part II of this project.

Uses of Maesil Extract:

Old wives tale, maesil is good for your digestive system … I personally have tried and it really made me s*** (go number 2).  And also, maesil extract is good for when you have an upset stomach … yes, I tried it when I had a mad case of diarrhea and it worked magic.  Supposedly, it has high mineral and vitamin contents too.  Anyways, you mix your extract with some water or ice, and then drink it.

Some people like just like the taste of it as a cold drink for the summer to cool you down, or as a hot tea to drink in the winter.   Whatever floats your boat.

**Sorry, I didn’t take any photos along the way BUT look forward cause I will attach some in the next post.  Also, good luck with your own Project Maesil.**


UPDATE:  07/31/14  Pictures from this year.
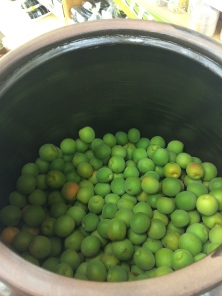
Maesil

Maesil

IMG_2142

Maesil


IMG_2147

황아이

IMG_2144

Maesil first, then sugar!

IMG_2146

Sugar on top!

IMG_2150

Little experiment with a few Maesil. After 1 day, look at how the sugars are melting.


Hello Local Shoppers of Asian Goods!

Hi everyone,

Just to keep things short, call me Soo (sounds like Sue).  My parents run a mom-and-pop Asian grocery store geared towards Korean.  Yes, the workers (not limited to Koreans) don’t really speak English fluently but hey, give them a break cause they try to listen carefully even when you speak a mile per minute.

So the purpose of this blog would be to educate all those wonderful readers out there, yes I mean you, about the world that happens inside a Korean grocery store.  You are probably thinking what can go on in such a place but you never know until you step inside one (maybe you need to come by a few times) before you realize how friendly Koreans can be.

If you have any questions, feel free to e-mail me(?) or comment(?) and lets see if I can figure out how to  actually read and then answer them as honestly as I can through this blog.   Sorry, very new to this blogging stuff so cutting me some slack would be much appreciated.

Happy reading.

Soo